The post How to Select the Best Curing Tote for Your Droidcure appeared first on Droidcure.
]]>One of the most foundational decisions for a successful cure, especially when leveraging the precise humidity control for cannabis curing offered by your Droidcure device, is selecting the ideal curing container.
Not all containers are created equal, and the choice you make can significantly impact how smoothly your cure goes. Let’s dive into the world of curing totes and explore the best options to ensure your Droidcure can work its wonders, leading to a truly exceptional cure.
Key Factors for Selecting Your Cannabis Curing Container
To ensure optimal results with your Droidcure, consider these five crucial factors when choosing your cannabis curing tote:
- Curing Tote Size (Gallons)
- Airtightness
- Tote Shape for Droidcure Mounting
- Food-Grade Material
- Curing Chamber Wall Width
Let’s dive into each of them:
Curing Tote Size
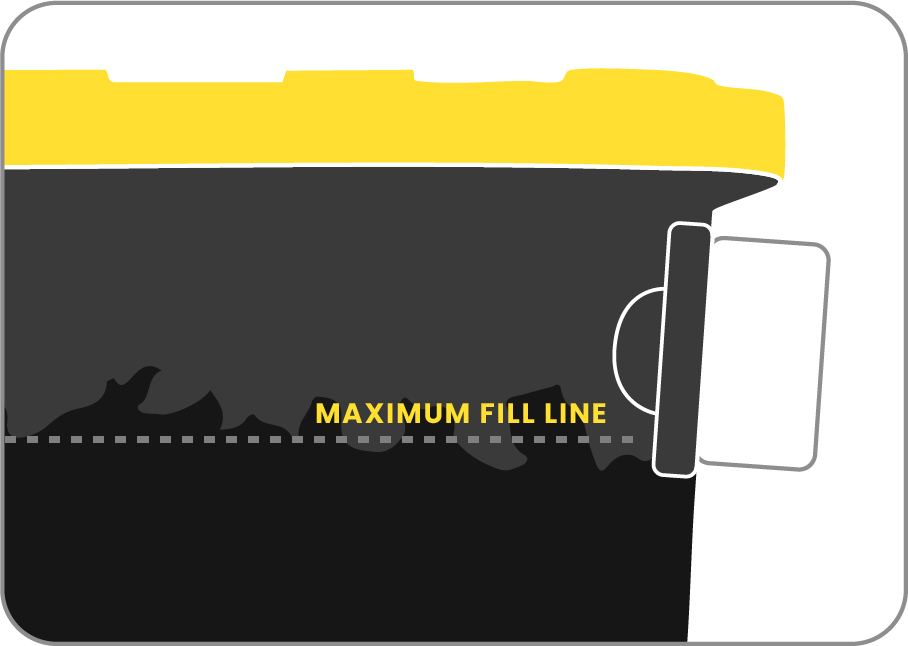
For your Droidcure to effectively manage humidity, choose a curing tote between 5 and 27 gallons. This range allows the pump to exchange air properly. While slightly larger totes can be used, the pump may overwork, potentially shortening its lifespan. A tote that’s excessively large may also put your bud at risk of molding if air can’t exchange fast enough.
Sticking to the 5 to 27-gallon range ensures optimal air exchange and device longevity.
Airtightness for Precise Cannabis Curing
An airtight seal on your curing tote is paramount for minimizing any unwanted exchange of air with the external environment. This crucial feature prevents the loss of the carefully regulated humidity levels for curing cannabis created by your Droidcure, ensuring the device operates efficiently and your cannabis cure progresses at the desired pace. Reputable brands like Husky offer airtight storage containers in various suitable sizes.
Prioritizing an airtight cannabis curing container becomes especially important for those in consistently dry environments, such as Colorado year-round or during northern winters. Without a tight seal, dry ambient air can easily infiltrate the curing chamber and lead to overly rapid drying of your buds.
If you’re able to regulate your lung room’s RH to stay just below where you’re trying to cure to, airtightness becomes less critical. For more budget-friendly options, consider using an HDX brand tote. If air leakage becomes an issue, you can easily enhance its seal by installing weather stripping tape around the lid.
Tote Shape for Mounting
For a secure and stable attachment of your Droidcure device, your curing tote must have a flat surface measuring at least 4.5 inches by 4.5 inches that you can drill into using a 4 inch hole saw. This flat area is essential for the Droidcure to mount correctly, typically on the upper portion of the front or side of the cannabis curing container.
Ideally, try to attach the Droidcure on the upper part of the side. This maximizes your space for plant material since you shouldn’t cover the fan/sensor.
To simplify your selection process, each Droidcure includes a convenient Tub Template. We highly recommend taking this template with you when shopping at your local hardware store to ensure any potential curing tote offers a compatible flat area for secure mounting.
Food-Grade Material
We strongly recommend using a tote or container made from food-grade material for your cannabis curing. Popular brands like Husky, HDX, and many Sterilite totes offer food-grade options.
Choosing a food-grade container ensures that no harmful chemicals will leach into your valuable cannabis during the curing process, preserving its quality, aroma, flavor, and safety for consumption. Always look for clear labeling or certifications on the company’s website indicating that the storage tote is safe for food contact.
Even with food-grade totes, it’s worth noting that some manufacturers utilize release agents during the molding process. These substances help the plastic product detach easily from the mold. It’s a prudent step to thoroughly wash your new food-grade tote with warm water and dish soap before its first use. After washing, ensure the tote is completely dry before introducing your dried cannabis and Droidcure device. This simple precaution will provide an extra layer of assurance for a clean and pure curing environment.
Curing Chamber Wall Width
While most standard storage totes and plastic containers will work perfectly with your Droidcure, if you are considering using a non-standard curing chamber option, such as a small wine fridge, it’s crucial to ensure that the walls are less than 11 millimeters (mm) thick. This limitation ensures that the Droidcure mounting screw can securely attach the device to your chosen curing container.
Wrapping Up: Selecting the Ideal Container for Cannabis Curing with Droidcure
Selecting the right vessel is a key first step in your curing journey with Droidcure. By keeping size, airtightness, shape for mounting, and food-grade material in mind, you’ll create the ideal environment for your buds to reach their full potential.
With the right tote as your foundation, your Droidcure can work its magic, ensuring a flavorful, aromatic, and perfectly preserved harvest.
Happy growing and curing!
Still have questions? Reach out to us at [email protected] for additional support.
The post How to Select the Best Curing Tote for Your Droidcure appeared first on Droidcure.
]]>The post Relative Humidity vs. Temperature: A Cannabis Curing Conundrum appeared first on Droidcure.
]]>RH refers to the amount of water vapor in the air compared to the maximum amount of water vapor the air can hold at a specific temperature.
Think of it like a sponge. A dry sponge can absorb a lot of water. As it gets more saturated, it can’t hold as much additional water. Similarly, as air gets colder, it isn’t capable of holding as much additional moisture.
So, if you have a jar of plant material stabilized to a certain RH and you change the temperature, the RH reading will change even though the actual amount of moisture in the jar hasn’t changed.
The Impact on Cannabis Curing
Curing is a critical process that involves slowly drying and moisture-stabilizing the cannabis to make it safe for long-term storage, which also improves the flavor and smell by breaking down compounds like chlorophyll.
During this process, it’s essential to maintain a specific RH level to prevent mold and mildew growth while allowing the plant material to cure properly. Understanding the relationship between temperature and RH is necessary for getting your ideal cure in your specific lung room and storage environments.
One common way growers are affected is when curing in a cooled environment (like in a refrigerator/cooler) then bringing the cannabis back up to room temperature for consumption. When bringing cool cannabis back up to room temperature, you will likely notice a slight decrease in the RH reading.
This doesn’t mean that the cannabis has suddenly become drier. It simply means that the warmer air can now hold more moisture, so the relative humidity reading drops.
We highly recommend you keep the temperature in your lung room as stable as possible throughout your entire curing process to avoid any confusion.
Applying the Concept
The difference in RH is surprisingly significant at varying temperatures:
- Cannabis cured at 55°F to 62% RH will become 36.6% RH at 70°F
- Cannabis cured at 60°F to 62% RH will become 43.8% RH at 70°F
- Cannabis cured at 65°F to 62% RH will become 52.2 RH at 70°F
- Additionally, the chart below shows how cannabis cured at 65°F changes when exposed to different temperatures. You can see that cannabis cured at 65°F to 60% RH will change to 42.7% RH when brought up to 75°F.
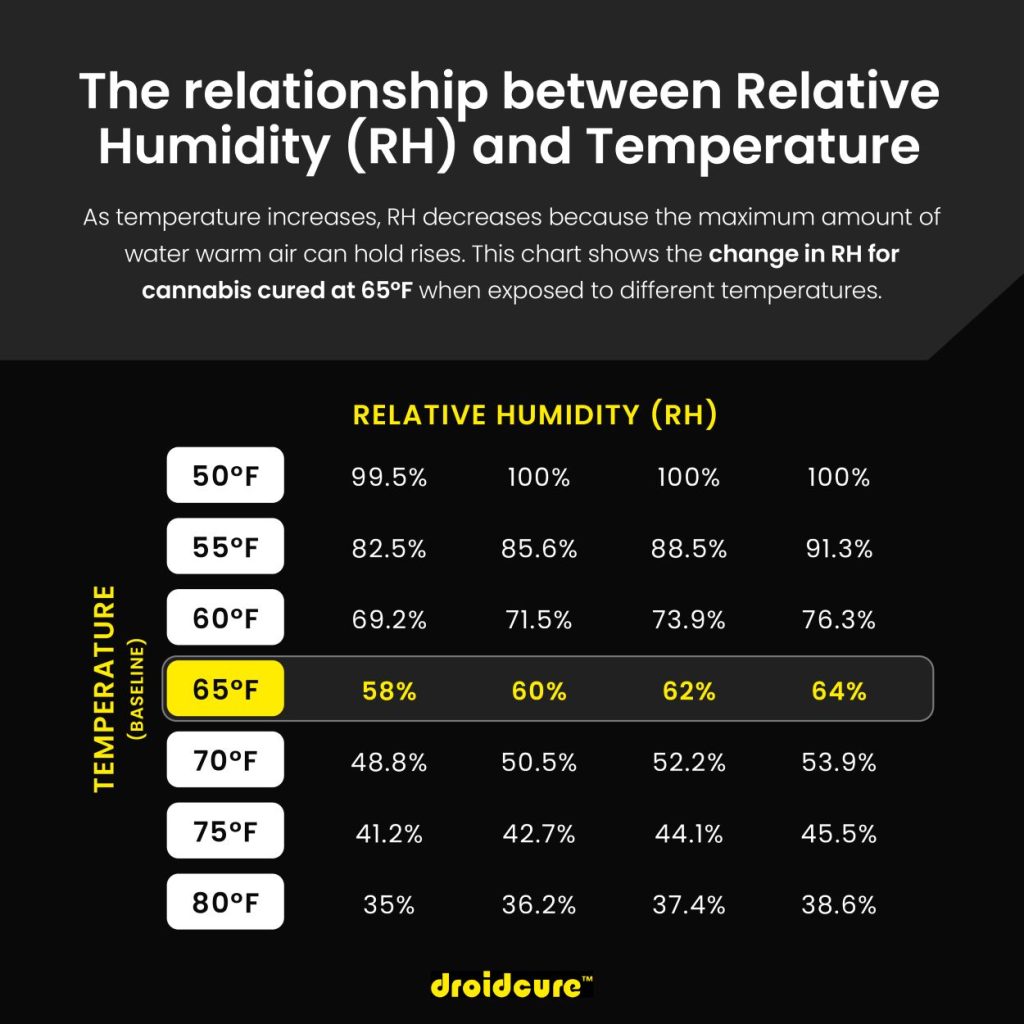
You can play around with more RH and temperature conversions at https://www.markusweimar.de/en/humidity-calculator/
The post Relative Humidity vs. Temperature: A Cannabis Curing Conundrum appeared first on Droidcure.
]]>The post Revive Overdried Cannabis: A Simple Guide to Rehydration for Curing appeared first on Droidcure.
]]>Drying cannabis is a crucial step in the post-harvest process, but it’s easy to go too far especially if you’re busy or have to leave town for a few days. If your flower is feeling crispy and dry, don’t worry. There’s a simple method to rehydrate them without sacrificing quality.
Enter the Droidcure and Cellulose Sponges
Using a device like the Droidcure, you can effectively rehydrate overdried buds. Here’s how:
1) Prepare the Sponges: Wet cellulose sponges with reverse osmosis (RO) or distilled water to avoid microbial growth and salt buildup. Make sure to wring them out thoroughly. You may even want to cut the sponge in half, so it creates less moisture in your curing chamber and rehydrates them more slowly. (If you can’t get cellulose sponges, use a paper towel that’s wrung out well.)
2) Set the Droidcure: Place the overdried flower in the Droidcure and insert the wet sponges in the back of the chamber, not touching your flower. Set the humidity to 66% until moisture appears stabilized (chart line should be straight across, and you may see “cure finished” message).
3) Adjust Humidity: After stabilizing at 66%, remove the sponges and lower the humidity to 62%. (If you’re trying to end your cure above 62%, set it to that value instead.)
4) Finish the Cure: Finish your cure to your desired relative humidity. You can leave them at 62%, or cure them to a slightly lower humidity like 59%.
By following these steps and using the Droidcure, you can effectively rehydrate overdried cannabis and enjoy a high-quality product. Remember, a little experimentation can go a long way in perfecting your growing and curing process.
We encourage home growers to share their experiences with this method. Your feedback can help others learn and improve their curing techniques!
Which bins are pictured?
The HDX 14-gallon tote paired with two 8″ x 14″ Design Ideas Meshworks stacking bins creates a tidy storage solution and allows growers to separate strains in the curing chamber.
The post Revive Overdried Cannabis: A Simple Guide to Rehydration for Curing appeared first on Droidcure.
]]>The post Dialing in your Cannabis Cure for Specific Uses: Rosin, Smoking, & Storage appeared first on Droidcure.
]]>The post-harvest process is a critical step in maximizing the quality of your cannabis.
It involves drying the flowers slowly and evenly then stabilizing moisture with your cure, allowing the chlorophyll to break down and the buds to develop the unique flavors and aromas we associate with cannabis.
The ideal moisture content varies depending on your intended use.
And thankfully, Droidcure makes it incredibly easy to select your target relative humidity based on what you want to do:
How to Cure Cannabis for Rosin
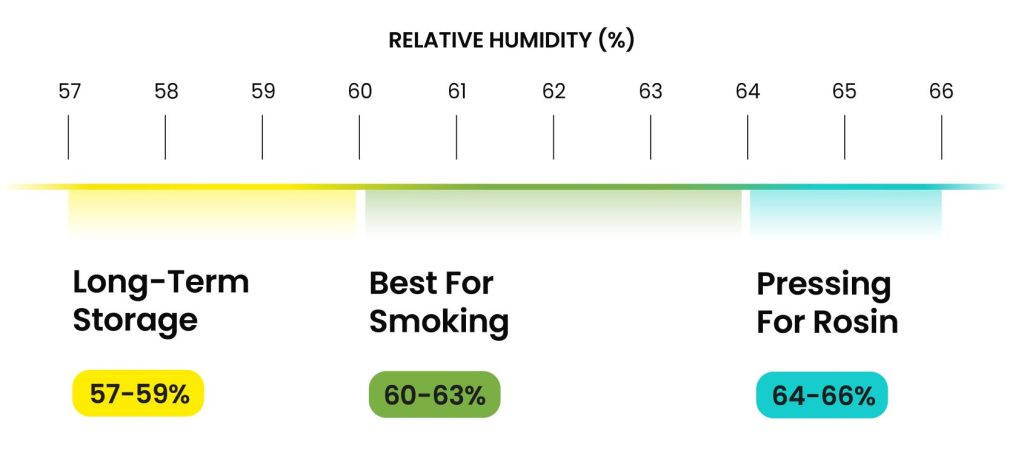
For pressing cannabis buds to extract rosin, a slightly higher moisture content is beneficial. The moisture prevents the extracted oil from wicking back into the plant material, ensuring that the resin remains concentrated and is easier to extract. Set your Droidcure to around 64-66% humidity to aid in the extraction of THC and other cannabinoids.
Additional tips for pressing:
- Use a high-quality rosin press
- Apply even pressure to the buds
- Avoid over-squishing, as this can result in lower-quality rosin
- You can rehydrate your flower if it’s already below 64-66% RH
- If you’re in the MN Twin Cities metro area, consider renting a rosin press from Reefer Rentals for easy, hassle-free pressing. (We’ve rented their press before and can vouch for them!)
Curing for Everyday Use
If you’re planning to store your cured cannabis in a jar for everyday smoking or vaping, a slightly lower moisture content is ideal. This prevents the buds from becoming too sticky or getting moldy.
Aim for a target cure of around 60-63%. This will ensure that the cannabis is dry enough to smoke or vape smoothly, while still retaining their flavor and potency.
Additional tips for everyday use:
- Store cured cannabis in a cool, dark place for the best preservation
- Use an airtight jar to prevent moisture loss, like a stainless steel or glass jar
- Open your jar as little as possible, and for only short periods of time
- Consume within a reasonable timeframe to maintain optimal quality
Curing for Long-Term Storage
For long-term storage, it’s essential to keep the moisture content as low as possible, within reason. This helps to prevent the breakdown of cannabinoids and terpenes, preserving the quality of the cannabis over time. Set your Droidcure to 57-59% humidity.
A lower moisture content also helps prevent the breakdown of cell walls, ensuring that your cannabis remains safe and potent for years to come. Use oxygen absorbers in the storage container to minimize oxidation and keep your flower close to perfect for a very long time.
With Droidcure, you also have the option to rehydrate your flower back up to your ideal relative humidity later on.
Additional tips for long-term storage:
- Consider freezing cured cannabis for extended storage
- Periodically check for signs of degradation or mold
- Use vacuum-sealed bags or containers for optimal preservation
Remember, these are general guidelines, and the optimal moisture content may vary depending on the specific strain, growing conditions, and your personal preferences. Experiment with different settings to find what works best for you!
The post Dialing in your Cannabis Cure for Specific Uses: Rosin, Smoking, & Storage appeared first on Droidcure.
]]>